[↓] Pitch up
[↑] Pitch down
[→] Roll right
[←] Roll left
[S] Rudder right
[A] Rudder left
[X] Throttle up
When the RPM increases, it will stop at 100% (military power). To activate the afterburner, press again [X].
[Z] Throttle down
When the RPM decreases from afterburner, it will stop at 100% (military power). To continue reducing the RPM, press again [Z].
To set the throttle to stop position, reduce the RPM to 70% (idle), then press again [Z] and hold it for 3 seconds.
[W] Wheel brakes
[Q] Air brake
[NUMPAD 1] Trim up
[NUMPAD 7] Trim down
[M] Show meteo information for the selected navigation station (for airports only)
[N] Show atmosphere information for the current airplane position
[I] Switch to instrumental flight mode
When the Mouse is selected for flight control device, the mouse pointer becomes hidden. To enable the in-flight button press on the cockpit, hold the [Right mouse button] or the [Ctrl] key.
The flight control sensitivity can be adjusted from the mouse settings in the Control panel of your computer.
Mode 1 - when you release the pitch up or the pitch down key, the pitch control will not return to neutral position. This mode ensures smooth flight. Useful with Keyboard flight control device.
Mode 2 - when you release the pitch up or the pitch down key, the pitch control will return to neutral position. Useful with Keyboard flight control device.
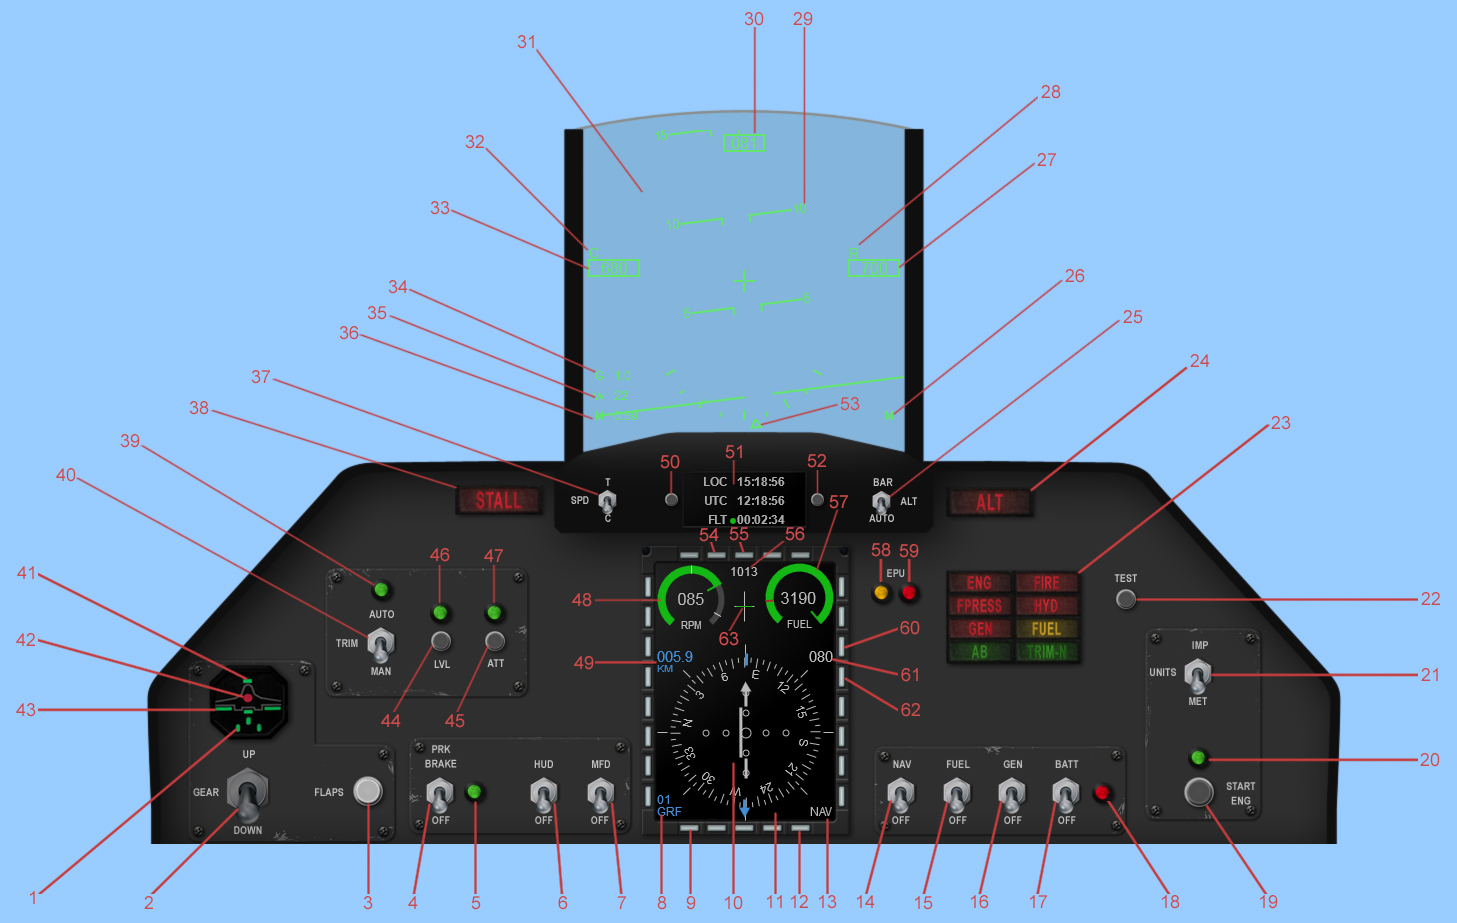
1. Landing gear DOWN light
2. Landing gear UP/DOWN
3. Flaps UP/DOWN
4. Parking brake ON/OFF
This turns on the wheel brakes. The parking break will disengage automatically above around 85% RPM.
5. Parking brake ON light
6. Head-up display (HUD) ON/OFF
7. Multifunctional display (MFD) ON/OFF
8. Selected navigation station
9. Change the navigation station button
10. Horizontal situation indicator (HSI)
The HSI is a navigation instrument, which provides course, heading, bearing and distance information to a TACAN/VOR/ILS station
How to use HSI in NAV mode?11. Multifunctional display (MFD)
12. Change the navigation mode button
13. Navigation mode
NAV - TACAN/VOR mode
What is TACAN?ILS - ILS mode
What is ILS?14. Navigation system ON/OFF
15. Fuel pump ON/OFF
16. Generator ON/OFF
The generator is the main source of electrical power and is powered by the engine. It becomes operational at approximately 50% RPM.
17. Battery ON/OFF
The batteries provide minimal power to certain systems only.
18. Battery light
The red light illuminates when the battery is the main power source or the battery voltage is low. The amount of power available from the battery is limited so do not leave the battery to be the main power source for more than 5 minutes.
19. Start engine button
20. Starting engine light
21. Units
Switches between metric units and imperial units.
22. Test button
When the button is pressed, all the lights should come on.
23. Annunciators panel
ENG - engine RPM is below 70%
FIRE - engine fire
FPRESS - fuel system pressure low
HYD - hydraulic system pressure low
GEN - the generator is inoperative
FUEL red - the remaining quantity of fuel is below 500kg
FUEL yellow - the remaining quantity of fuel is below BINGO
AB - the afterburner is activated (RPM > 100%)
TRIM-N - the trim is set to neutral position
24. Altitude light
When the landing gear is UP, the light illuminates yellow when the height above surface is below 200m and red below 100m.
25. Altitude mode switch
Switches between modes of the altitude indicator.
BAR - altitude above sea level
AUTO - when the heigh above surface is below 1000m, the altitude indicator shows the heigh above surface, otherwise it shows the altitude above sea level
26. Units indicator
M - metric units
I - imperial units
27. Altitude indicator
Shows the altitude in meters.
28. Altitude mode indicator
empty - the altitude indicator shows the altitude above sea level
R - the altitude indicator shows the heigh above surface
29. Pitch angle
30. Heading
31. Head-up display (HUD)
32. Airspeed mode indicator
C - the speed indicator shows the calibrated airspeed
T - the speed indicator shows the true airspeed
33. Airspeed indicator
Shows the airspeed in km/h.
34. G-force
35. Vertical speed
Shows the vertical speed in m/s.
36. Mach number
37. Airspeed mode switch
Switches between modes of the airspeed indicator.
C - calibrated airspeed
T - true airspeed
More about airspeed...38. Stall light
This light illuminates red when the airspeed is too low that the airplane won’t generate lift (185 - 215km/h depending on the weight with flaps DOWN and 220 - 255km/h with flaps UP), and yellow when the airplane is about to stall.
39. Trim in AUTO setting light
40. Trim MANUAL/AUTO
Set the trim automatically to maintain level flight when the roll is 0°. Useful in Keyboard Mode 1.
41. Airbrake ON light
42. Damage in the landing gear light
43. Flaps DOWN light
44. Level button
Brings into level flight.
45. Attitude button
Maintain automatically the current pitch and roll. Inoperative when the landing gear is DOWN or pitch > 30° ot roll > 60°.
46. Level function ON light
47. Attitude function ON light
48. Engine RPM
The RPM indicator displays the engine revolutions per minute. RPM is expressed as a percentage from 0% to 100%. 0% is stop, 70% is idle, 100% is the equivalent of full military power and 105% is full afterburner.
49. The slant distance to the selected navigation station
50. Timer modes button
Cycles through timer modes.
51. Timer
The timer has several modes:
Time mode
LOC - the current local time
UTC - the current UTC time
FLT - the time elapsed in flight
Fuel mode - displays the remaining time until the fuel runs out
BNG - the remaining time until the fuel reaches the BINGO quantity
OUT - the remaining time until the fuel runs out
SET - set BINGO fuel quantity (the minimum fuel quantity to safely reach the airport)
GPS mode
LAT - the current latitude
LNG - the current longitude
GS - the current ground speed
EPU mode - displays the remaining EPU fuel
52. Timer settings button
Time mode - START/STOP/RESET the flightime
Fuel mode - set the BINGO fuel quantity
53. Roll angle
54. Set altimeter pressure - button
55. Set altimeter pressure + button
56. Altimeter pressure
57. Fuel quantity
58. Emergency power unit (EPU) ON light
The EPU is a hydrazine-powered, self-contained unit that can provide emergency hydraulic and electrical power for about 10 minutes. If the generator is OFF and the engine RPM is above 80%, it will simply derive power from the engine and the light will start to blink. However, as soon as RPM drops below 80%, the EPU will start to burn EPU fuel and the light will be constantly lit.
59. Emergency power unit (EPU) fuel exhausted light
This light illuminates when the EPU fuel runs out.
60. Selected HSI course + button
61. Selected HSI course
62. Selected HSI course - button
63. Trim position
GRF 25°C 51% QNH 1014 QFE 991
GRF - the selected navigation station
25°C - the air temperature at the selected navigation station
51% - the relative humidity at the selected navigation station
QNH 1014 - What is QNH?
QFE 991 - What is QFE?
- Battery ON.
The battery red light should illuminate, showing that the battery is the main power source. The amount of power available from the battery is limited so do not leave the battery to be the main power source for more than 5 minutes.
- Test button - press and hold.
All cockpit lights should illuminate when the button is pressed.
- Fuel pump ON.
The FPRESS warning light goes off.
- MFD ON.
- Parking brake ON.
Parking brake light should illuminate.
- Engine start - press.
- The engine start light should illuminate.
- Engine RPM should start to increase and stops at 20%.
- At 20% RPM move the throttle up to idle position by pressing the [X] key. Engine RPM should start to increase.
- At 40% RPM the hydraulic pump comes on line. The HYD warning light goes off.
- At 55% RPM the engine start light goes off.
- At 70% RPM the ENG warning light goes off.
- Generator ON
The GEN warning light goes off. The battery red light goes off.
- Navigation ON.
- Navigation station - set as required.
- HSI cоurse - set as required.
- HUD ON.
- Set the altimeter pressure according to the airport QFE (get the meteo information by pressing the [M] key).
- Flaps DOWN.
- Check trim in neutral position.
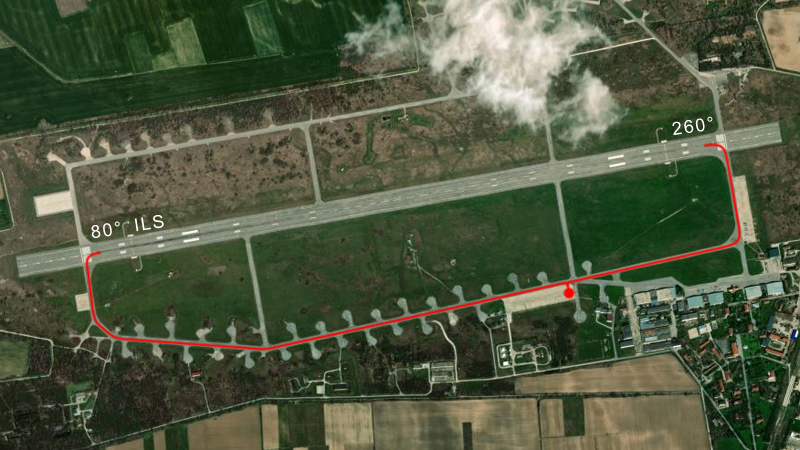
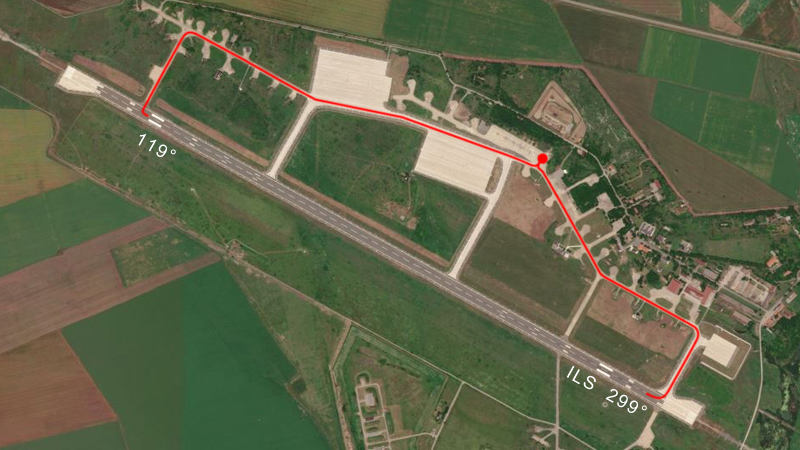
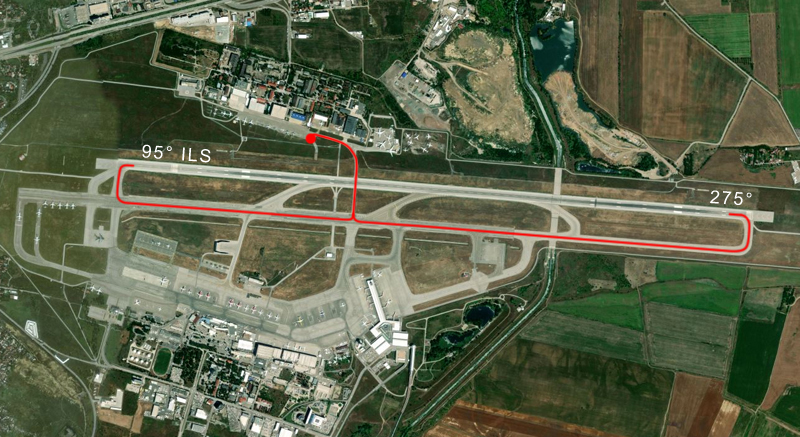
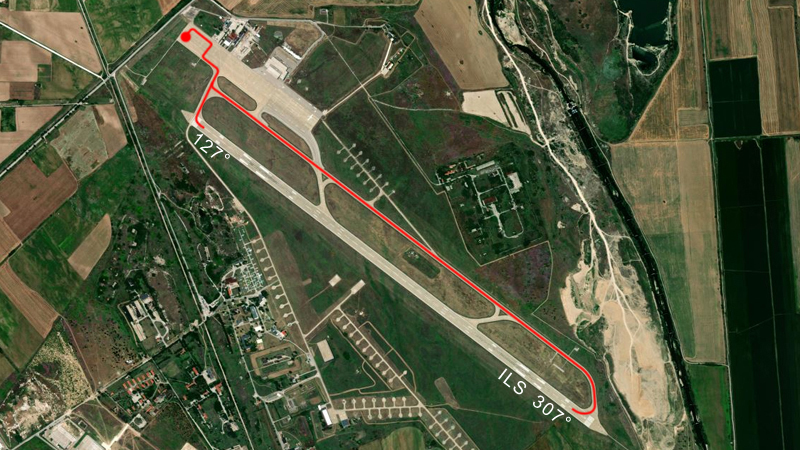
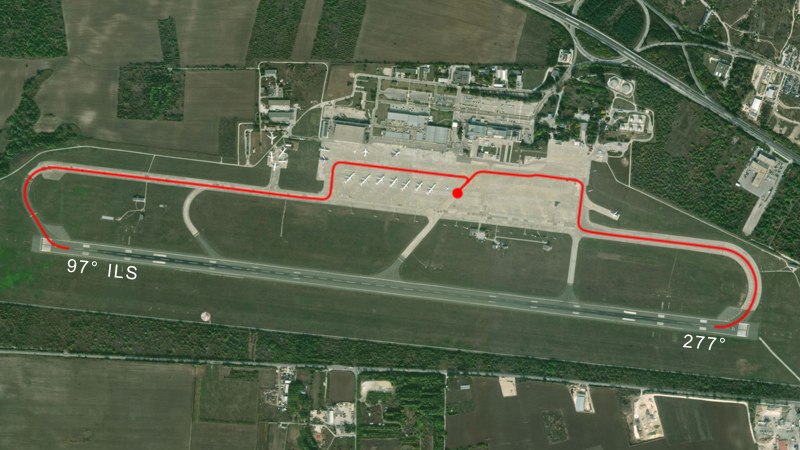
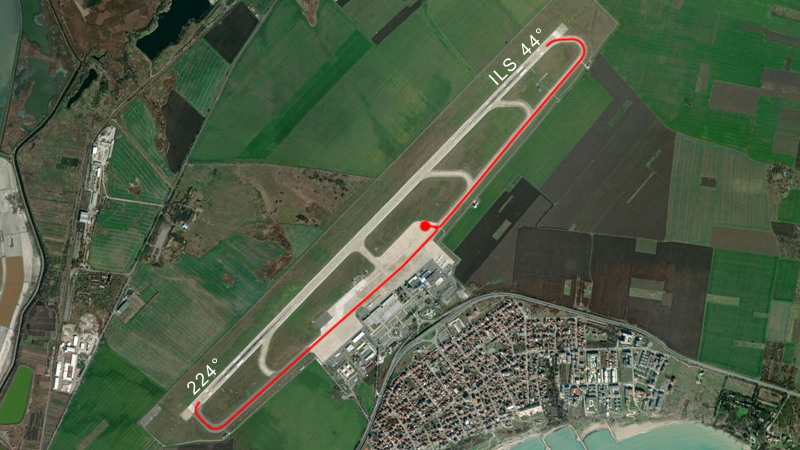
- To navigate to the assigned runway, it can be helpful to check the airbase images until you gain familiarity with the layout.
- When you are ready to start rolling, disengage the parking brake, advance the throttle [X] and use the rudder pedals to steer left [A] and right [S]. A throttle RPM 75-80% will be required to begin rolling. Reduce throttle by pressing [Z]. Press [W] to apply wheel brakes.
- Once lined up for takeoff on the directed runway, apply the wheel brakes to stop the airplane.
- Check airbrake OFF.
- Verify barometric altitude is 0.
- Set timer to Time mode.
- Apply and hold the wheel brakes [W].
- Increase the RPM to 90% [X].
- Press the Timer settings button to start the flight time.
- Disengage the wheel brakes and set the RPM to 100% or to full afterburner.
- At approximately 150km/h pull up by holding [↓] and establish 5° pitch angle. Warning: do not exceed a 15° pitch angle or you will scrape the nozzle on the runway.
- When the takoff speed is reached (240 to 270km/h depending on the weight), ensure a positive rate of climb is established and raise the landing gear. The landing gear should be up before exceeding 550km/h ot it might get damaged.
- At 400km/h - flaps UP.
- Altimeter pressure - set as required.
- Set the altimeter pressure according to the airport QFE (get the meteo information by pressing the [M] key).
- Align your aircraft with the runway.
- Gear DOWN.
- Flaps DOWN.
- Airbrake ON.
- The touchdown speed is about 250-260km/h.
- The touchdown is successful when:
- the vertical speed does not exceed -2m/s
- the roll angle does not exceed 5°
- After the touchdown reduce the throttle to idle and apply the wheel brakes to reduce the speed.
- Go to the FLT mode on the timer and press the timer submodes button to stop the flight time.
- Taxi to the end of the runway.
- Flaps UP.
- Airbrake OFF.
- Taxi to the parking location.
- Perform the ramp start procedure in reverse order.
- Do not exceed 1500km/h calibrated airspeed, otherwise the airplane might get damaged!
- Do not fly with less than the stall airspeed (185 - 215km/h depending on the weight with flaps DOWN and 220 - 255km/h with flaps UP), otherwise the airplane might get stalled!
- Do not exceed 550km/h calibrated airspeed with landing gear in DOWN position, otherwise the landing gear might get damaged!
- Do not exceed 400km/h true airspeed on the runway, otherwise the landing gear might get damaged!
- Do not apply the wheel brakes if the true airspeed exceeds 300km/h, otherwise the landing gear might get damaged!
- Do not exceed 15° pitch on the runway, otherwise you will scrape the nozzle on the runway and the plane will catch fire!
- Do not fly with negative G more than 30s at 100% RPM and 10s at afterburner, otherwise the engine might stop!
- Do not hit the ground...!
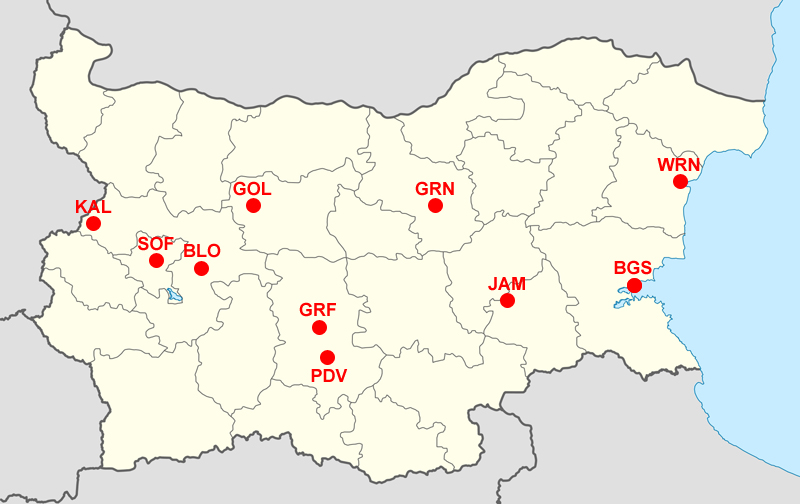
Navigation channels:
01 GRF - TACAN at Graf Ignatievo Air Base
02 JAM - TACAN at Bezmer Air Base
03 SOF - VOR at Sofia Airport
04 WRN - VOR at Varna Airport
05 PDV - VOR at Plovdiv Airport
06 BGS - VOR at Burgas Airport
07 GRN - VOR at Gorna Oryahovitsa Airport
08 BLO - VOR near Bailovo
09 GOL - VOR near Golyama
10 KAL - VOR near Kalotina